OSGi in a Nutshell: Working with service configurations
Today we will see a slightly more complicated version of the use case we saw last week. We will always talk about services, but of configurable services.
Use Case
Imagine you have two or more implementations for the same service, and you have a consumer which needs one of your implementation at a certain point, and the other one at another point. Or, maybe you have more consumers, and some of them need the first implementation of your service, while some others need the second one.
For instance, let’s suppose you want to provide a service which allows to export some data into a file. Suppose your client does not want to be limited to just one file format to see his data, but would like to be able to export them both in .ods and .txt. The contract is basically the same in both cases: he wants to export some data into a file. But the way you achieve one or the other (an export to an .ods and to .txt) is probably different, right? You would need, then, two different implementations! Then in the UI, you probably would like to associate to an Export to .ods button the first implementation and to an Export to .txt button the second one.
How can we handle such situation? How can we distinguish among different implementations of the same service interface? This is where configurations come into play!
Configurations
You can think of a configuration simply as a list of properties, where each property is a key/value pair. And these properties are just labels for our service implementations, a sort of schematic description of what an implementation can handle, compared to another one.
Coming back to our data export example, a good property name to distinguish between the two implementations would be format, which could then be equal to ods for the first implementation and to txt for the second one.
You got the idea, right? Then let’s see how we can work with service configurations in plain Java and then using OSGi!
Pure Java
In Java, common practice is to place your configurations in a .properties file. So, in our case we could write two .properties files. The first one, let’s call it export2ods.properties will contain something like:
format=ods
while the second one, export2txt.properties will be:
format=txt
Now, let’s create a Java Project with our service interface, our two implementations and a resources folder containing these properties files.
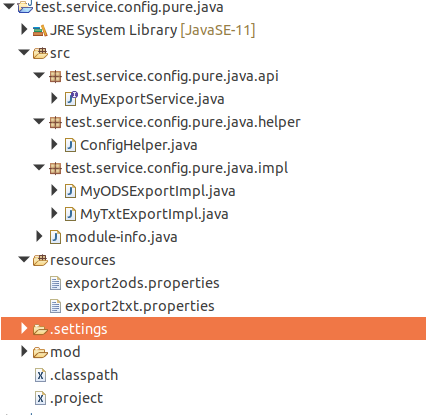
Our service interface just defines the contract:
package test.service.config.pure.java.api;

public interface MyExportService {
    String export();
    String getFormat();
}
while our two implementations will look something like:
package test.service.config.pure.java.impl;

import java.util.Properties;
import test.service.config.pure.java.api.MyExportService;
import test.service.config.pure.java.helper.ConfigHelper;

public class MyODSExportImpl implements MyExportService {

    ConfigHelper helper = new ConfigHelper("export2ods.properties");
    Properties prop = helper.getConfigProperties();

    @Override
    public String export() {

//      implementation details for actually exporting something into ods

        if(prop != null) {
            return "Exported to " + prop.getProperty("format") + " file";
        }
        return null;
    }

    @Override
    public String getFormat() {
        return prop.getProperty("format");
    }
}
package test.service.config.pure.java.impl;

import java.util.Properties;
import test.service.config.pure.java.api.MyExportService;
import test.service.config.pure.java.helper.ConfigHelper;

public class MyTxtExportImpl implements MyExportService {

    ConfigHelper helper = new ConfigHelper("export2txt.properties");

    Properties prop= helper.getConfigProperties();

    @Override
    public String export() {

//      implementation details for actually exporting something into txt

        if(prop != null) {
            return "Exported to " + prop.getProperty("format") + " file";
        }
        return null;
    }

    @Override
    public String getFormat() {
        return prop.getProperty("format");
    }
}
We used here an helper class, which takes as input parameter for the constructor the filename of the .properties file corresponding to the service implementation, and actually loads the configuration, allowing us to print the message after the export is done.
package test.service.config.pure.java.helper;

import java.io.IOException;
import java.io.InputStream;
import java.util.Properties;

public class ConfigHelper {

    private String configFile;

    public ConfigHelper(String configFile) {
        this.configFile = configFile;
    }

    public Properties getConfigProperties() {

        try(InputStream is =
                getClass().getClassLoader().getResourceAsStream(configFile)) {
            Properties prop = new Properties();
            prop.load(is);
            return prop;
        } catch(IOException e) {
            System.out.println("Error loading InputStream " + e.getMessage());
            return null;
        }
    }
}
We can then package our project into a .jar file, not forgetting to include also the folder containing the .properties files, and we can then move to our consumer project.
The consumer is very similar to the one we saw last week, in the sense that we can make use of the Java ServiceLoader to look for all the implementations of our service. In this case we expect two different implementations, and we want to differentiate when we find one with respect to when we find the other, so we can write something like:
package test.consumer.config.pure.java;

import java.util.ServiceLoader;
import test.service.config.pure.java.api.MyExportService;

public class MyServiceConsumer {

    public static void main(String[] args) {
        ServiceLoader<MyExportService> loader = ServiceLoader.load(MyExportService.class);
        for(MyExportService service : loader) {
            if("ods".equals(service.getFormat())) {
                System.out.println("Starting exporting to ods");
                System.out.println(service.export());
            }
            else if("txt".equals(service.getFormat())) {
                System.out.println("Starting exporting to txt");
                System.out.println(service.export());
            }
        }
    }
}
When we run MyServiceConsumer as a Java Application we should see something like:
Starting exporting to ods
Exported to ods file
Starting exporting to txt
Exported to txt file
as proof that both our service implementations have been loaded.
With OSGi (and bnd)
Let’s see now how we can achieve the same thing in an OSGi environment.
We can use, as we did for last week use case, our Gecko Templates, which you can use by adding to your dependencies:
<dependency>
  <groupId>org.gecko.runtime</groupId>
  <artifactId>org.gecko.templates</artifactId>
  <version>1.0.31</version>
</dependency>
We can use the template Component with API Development to generate our OSGi bnd project for our service and implementations.
Our service interface will look like:
package test.osgi.bnd.service.config.case1.api;

import org.osgi.annotation.versioning.ProviderType;

@ProviderType
public interface MyExportService{
    String export();
}
while, our two implementations:
package test.osgi.bnd.service.config.case1.impl;

import org.osgi.service.component.annotations.Component;
import test.osgi.bnd.service.config.case1.api.MyExportService;

@Component(service = MyExportService.class, property = "format=ods")
public class MyODSExportImpl implements MyExportService{

    /*
     * (non-Javadoc)
     * @see test.osgi.bnd.service.config.case1.api.MyExportService#export()
     */
    @Override
    public String export() {

//      Implementation details to export in ODS
        return "Finished exporting to ODS";
    }
}
package test.osgi.bnd.service.config.case1.impl;

import org.osgi.service.component.annotations.Component;
import test.osgi.bnd.service.config.case1.api.MyExportService;

@Component(service = MyExportService.class, property = "format=txt")
public class MyTxtExportImpl implements MyExportService{

    /*
     * (non-Javadoc)
     * @see test.osgi.bnd.service.config.case1.api.MyExportService#export()
     */
    @Override
    public String export() {

//      Implementation details to export in ODS
        return "Finished exporting to TXT";
    }
}
The important thing to notice here is that we are not using any .properties files, but we are defining the properties of each implementation through the element property of the @Component annotation.
When creating our service consumer, we can use the the template Component Development, and in our MyServiceConsumer we can inject both the service implementations like:
package test.osgi.bnd.case1.consumer;

import org.osgi.service.component.annotations.*;
import test.osgi.bnd.service.config.case1.api.MyExportService;

@Component(immediate = true)
public class MyServiceConsumer {

    @Reference(target = "(format=ods)")
    MyExportService myODSExport;

    @Reference(target = "(format=txt)")
    MyExportService myTxtExport;

    @Activate
    public void activate() {
        System.out.println("MyConsumer is active");

        System.out.println("Exporting to ODS");
        System.out.println(myODSExport.export());

        System.out.println("Exporting to txt");
        System.out.println(myTxtExport.export());
    }
}
As you can see, this time we select which kind of MyExportService we want through the element target of the @Reference component. The value of this element is a LDAP filter. For instance, if you have a service with multiple properties and you want to select one implementation based on two of these properties, the value of target should be something like:
&(prop1=value1)(prop2=value2)
For more information on the LDAP filter syntax, please visit here.
In the generated .bndrun file, add the dependencies, resolve and run.
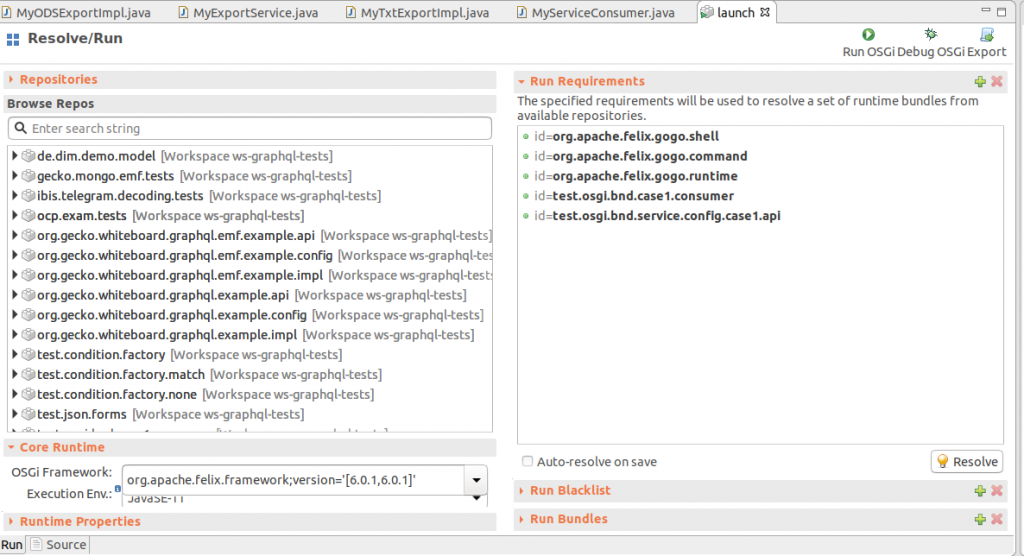
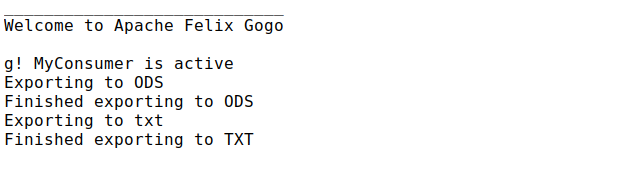
and in the console you should see that both the implementations are correctly injected and call.
Using the Configurator
When you have more complex services, which may be rely on a large set of properties, then the previously discussed approach could become a bit unpractical. You would need to write quite a lot of things inside the annotations and then your code would become quite dirty. Or, you could have a lot of services which just differ for a few properties but whose implementation looks very similar. Then you do not want to code a different implementation for all of them, right?
These cases can be addressed in OSGi with a configurator.
Let’s generate a second Component with API Development project from our templates, and this time let’s add an additional config folder.
Let’s then create an interface and just one implementation.
package test.osgi.bnd.service.config.case2.api;

import org.osgi.annotation.versioning.ProviderType;

@ProviderType
public interface MyMessageService{

    String getMessage();
}
package test.osgi.bnd.service.config.case2.impl;

import org.osgi.service.component.annotations.*;
import test.osgi.bnd.service.config.case2.api.MyMessageService;

@Component(configurationPid = "MyMessageService")
public class MyMessageServiceImpl implements MyMessageService{

    MsgConfig config;

    @interface MsgConfig {
        String name() default "Unknown";
        String greetings() default "Hi";
        String nextApp() default "tomorrow";
    }

    @Activate
    public void activate(MsgConfig config) {
        this.config = config;
    }

    /*
     * (non-Javadoc)
     * @see test.osgi.bnd.service.config.case2.api.MyMessageService#getMessage()
     */
    @Override
    public String getMessage() {
        String msg = config.greetings() + " " + config.name() + "," + config.nextApp();
        return msg;
    }
}
A lot of things are going on here. Let’s try to understand them.
- We set the
configurationPidelement in the@Componentannotation. This is like a prefix for all the service instances that we want to create and that should use this implementation; - Then we define a
MsgConfigannotation, with all the properties we need for the service. As you can see we also set some default values, in case some property is not found; - In the activation method we pass a
MsgConfigas parameter and we set that to our instance variable, in order to use it in thegetMessage()method.
But, where this configuration comes from? Where do we set a value different from the default ones? Well, we can create a config.json file in our config folder. For instance:
{
    ":configurator:resource-version": 1,
    "MyMessageService~polite":
    {
        "greetings" : "Dear",
        "name": "customer",
        "nextApp": "we would like to inform you that your next appointment is tomorrow."
    },
    "MyMessageService~friendly":
    {
        "greetings" : "Hi",
        "name": "dude",
        "nextApp": "see you tomorrow!"
    }
}
In this file we are setting the properties for two instances of the MyMessageService which should use the MyMessageServiceImpl implementation. You can see that because for both of them we used the same configurationPid value that we set in the implementation (MyMessageService). The part that comes after the ~ is the actual identifier of the service. In this case we have two, polite and friendly. Then comes the actual configuration, where you can identify the same properties we used in the MsgConfig in the implementation.
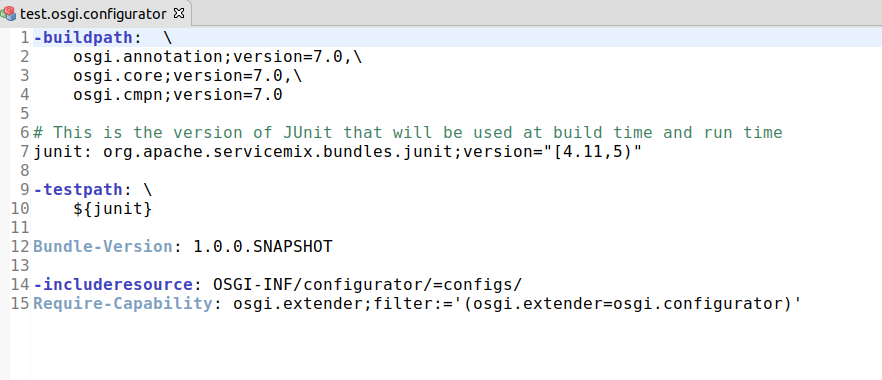
But how exactly is this sufficient to create two instances of MyMessageService? Well, it’s not, actually. We still need a simple addition. In the impl.bnd file, we need to add the OSGi configurator and to include the config folder to the resources.

With these directives, we are saying to the OSGi framework to look in the config folder and see whether it can find a configuration for which it knows what to do, namely for which we have an implementation.
Let’s create our usual consumer component.
package test.osgi.bnd.case2.consumer;

import org.osgi.service.component.annotations.*;
import test.osgi.bnd.service.config.case2.api.MyMessageService;

@Component(immediate = true, service = MyServiceConsumer.class)
public class MyServiceConsumer {

    @Reference(target="(service.pid=MyMessageService~polite)")
    MyMessageService politeMsgService;

    @Reference(target="(service.pid=MyMessageService~friendly)")
    MyMessageService friendlyMsgService;

    @Activate
    public void activate() {
        System.out.println("-------------");
        System.out.println("Polite Msg: " + politeMsgService.getMessage());
        System.out.println("-------------");
        System.out.println("Friendly Msg: " + friendlyMsgService.getMessage());
    }
}
This time, to select the two services we want we used the service.pid property and we set its value to the complete PID of the services, namely the configurationPid plus ~ and the unique identifier.
This time, in the .bndrun file, do not forget to include also the implementation package. When you press Resolve you should see something similar to this:

As you can see, two additional dependencies have been calculated by bnd: org.apache.felix.configadmin and org.apache.felix.configurator.
Indeed is the OSGi ConfigAdmin which is responsible to look for the different configurations files and trigger the creation of the various component instances.
When you run it you should see the two types of messages printed in the console:

We have already discussed that OSGi is a dynamic framework, right? So, what happens if we remove one of the two configurations from the .json file, while the application is running?
Let’s try! Simply remove one of the two configurations from the file and save the changes. You should see the application reloading automatically in the console, but this time no message is printed, of neither the services. Why is that? Well, we are injecting both the services into our consumer, but one of them is not found because we do not have any configuration that matches anymore for it, and so also the consumer is not activated!
If you type in the console list, you should see the different services, and you should see that the service consumer has UNSATISFIED REFERENCE. Try to type info plus the service id and you should get some more details on which reference is actually unsatisfied. Hopefully, this should be the one corresponding to the configuration you just removed!

Collecting all your Configurations
When you have a larger application. it is very likely that you would need a lot of configurations at runtime. What you could do, is to create a bundle which is responsible to collect all these configurations. Our Gecko Templates offer such a project, which is called Configurator.
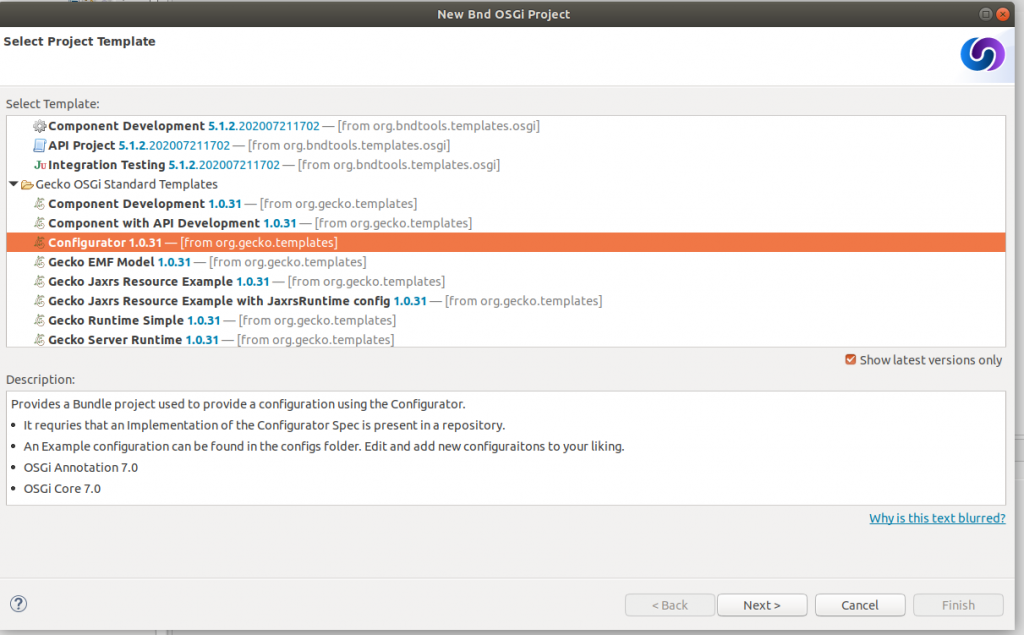
If you generate a new project using such template you should get something like:
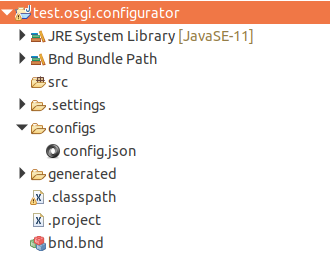
As you can see, nothing is generated in the src folder this time, but you have already the configs folder which contains a sample config.json file. In this folder you can place all the configuration files you need for your application. The generated .bnd file has already the directives to include the configs folder and to require the OSGi configurator.
This concludes our discussion on configurable services! Stay tuned for our next episode of the series!
by Ilenia Salvadori